Building your own cabinets might sound like a big job—and it is! But when you build custom cabinets around your appliances, you get to make your kitchen work exactly the way you want it to.
That means no awkward gaps, no wasted space, and a look that fits just right. You’re basically giving your appliances a home that suits them perfectly.
This post will walk you through how to build custom cabinets around appliances step by step. Don’t worry—we’ll keep it simple and clear.
No matter if you’re trying this for the first time or just want to understand the basics, you’ll learn how to plan, measure, and build with confidence.
Key Takeaways
- Measure carefully – Always double-check the size of your appliances and the space around them before you start building. A little mistake on paper can be a big problem in wood!
- Plan before you cut – Draw out your design so you know where everything goes. It’s like using a map before a road trip.
- Choose strong materials – Use sturdy wood and quality hardware so your cabinets last a long time and can handle daily use.
- Leave room to breathe – Make sure there’s enough space around your appliances for air to move, especially around ovens and fridges.
- Take your time – Building cabinets isn’t a race. Go step by step and check your work as you go. Slow and steady really does win this one!
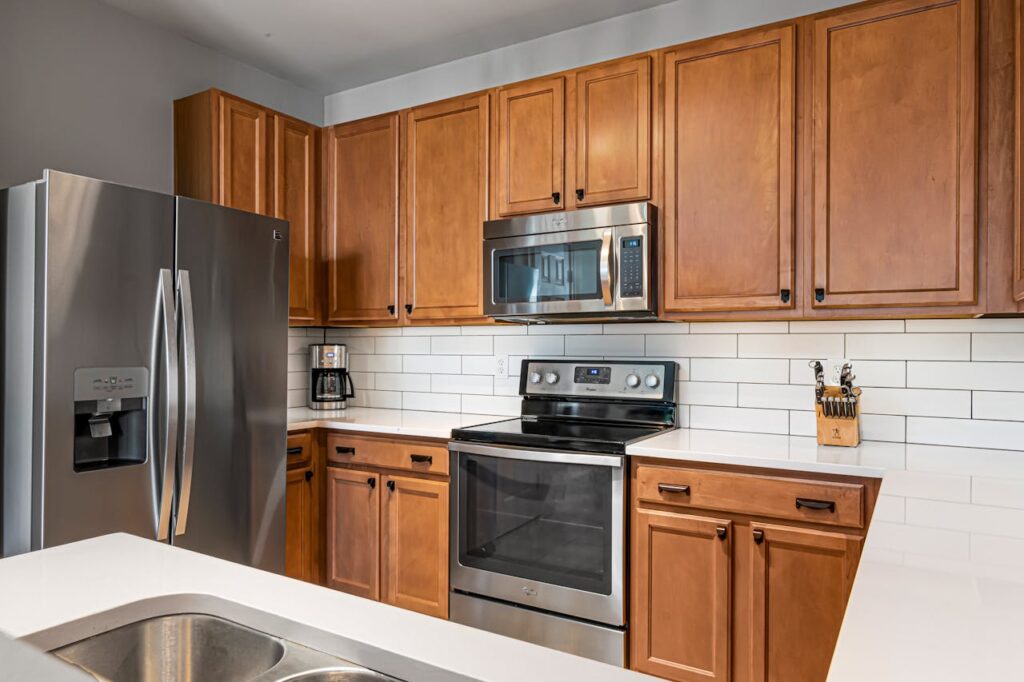
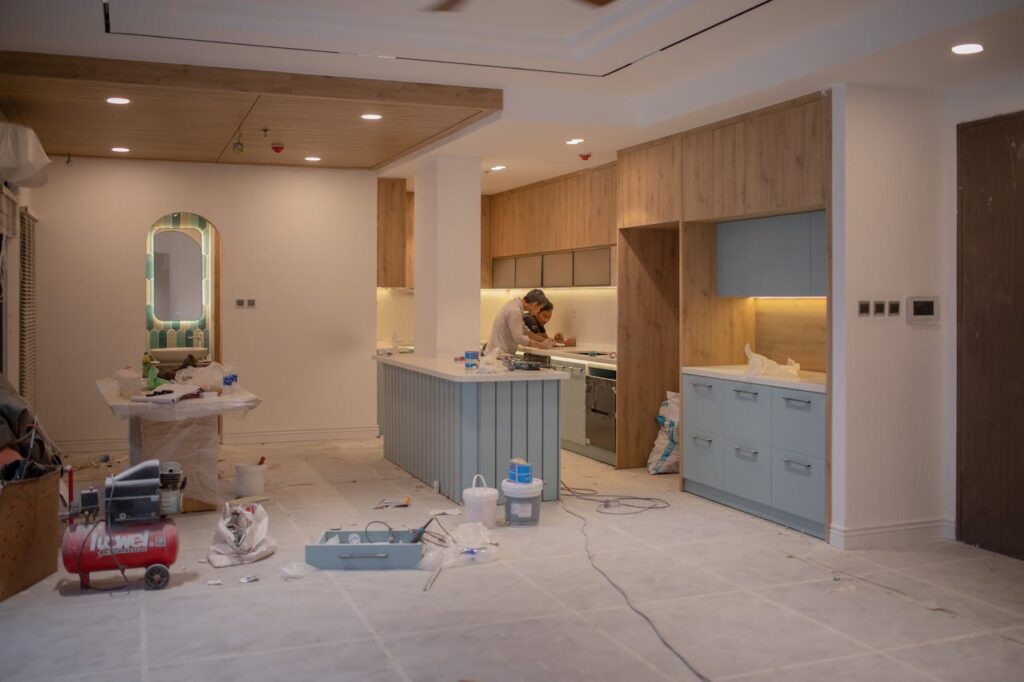
Why Custom Cabinets Around Appliances Matter
Every kitchen is different. Some are big and open. Others are small and cozy. But no matter the size, most kitchens have something in common—appliances. These include your fridge, oven, dishwasher, or even a microwave. They do important jobs every day. So it makes sense to build cabinets that fit around them perfectly.
When cabinets don’t fit well, a kitchen can feel messy or cramped. You might see big gaps around your stove or a tight squeeze next to your fridge. That’s not simply about looks—it can also make things harder to clean or use.
Custom cabinets solve that problem. They help your appliances feel like part of the kitchen, not just something stuck in later. It’s like building puzzle pieces that click together just right.
Everything lines up, looks good, and works better.
So, why does it matter? Because a well-designed kitchen doesn’t simply look nice—it makes cooking, cleaning, and living easier.
Understand Your Appliance Requirements First
Before you pick up a single tool, you need to know what you’re building around. That means understanding your appliances.
Think of it like making a frame for a picture—you have to know the picture’s size before you start cutting wood.
Here’s what to check:
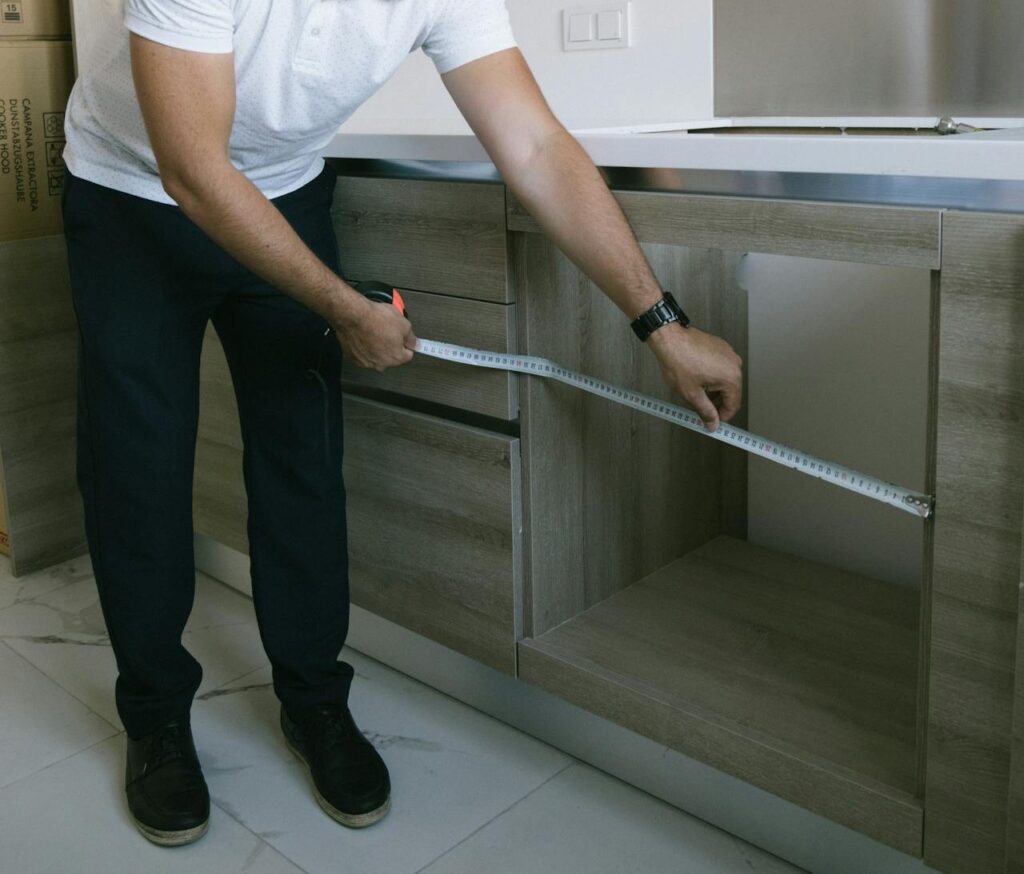
1. Measure your appliances
Use a tape measure to find the height, width, and depth of each appliance. Write those numbers down. Then, check the manual or look online for the manufacturer’s size guide—sometimes the real size is slightly different from what you measure!
Don’t forget to measure how far the doors swing open. You don’t want a cabinet blocking your oven door!
2. Know what they need
Some appliances, like fridges and ovens, need space around them for air to flow. This helps them stay cool and work safely. It’s called “ventilation space.” Your appliance manual should tell you how much room to leave.
3. Plan for the future
If you think you might replace your appliance later, leave a little wiggle room. New models may be a bit bigger or shaped differently. Planning ahead saves a lot of trouble later on.
Once you understand your appliances, you can start designing cabinets that fit them like a glove—snug, strong, and smart.
How to Build Custom Cabinets Around Appliances
Building custom cabinets around your appliances is a smart way to make your kitchen look neat and work better. Instead of trying to fit appliances into standard stock cabinets, you design the space just for them.
This means everything fits perfectly, looks smooth, and makes your kitchen feel truly custom.
Below, we’ll break down the important steps to help you build cabinets that fit just right and last a long time.
1. Measure appliance width, height, and depth exactly

Start by measuring your appliance carefully. Use a tape measure to get the exact width, height, and depth. This is super important because your custom cabinets have to fit just right around each appliance.
Think of your appliance like a puzzle piece—if your measurements are off, the whole picture won’t fit together well.
- Use a tape measure and write down the exact width, height, and depth.
- Measure door swings and handles to avoid blocking space.
- Double-check your numbers before cutting any wood.
- Keep a note of model numbers for reference if you need more details later.
2. Allow 1–2 inches clearance for ventilation gaps
Most appliances need a little space to breathe. This means you should leave about 1 to 2 inches of clearance around your appliance for ventilation. It helps keep things cool and working safely.
So, when you plan your cabinet space, remember this small gap—it makes a big difference!
- Check your appliance manual for recommended ventilation space.
- Add extra space if you plan to replace appliances in the future.
- Remember to leave gaps at the back and sides for airflow.
- Use spacers or shims when building to maintain consistent gaps.
3. Sketch cabinet layout including all dimensions
Before you start cutting wood, draw a sketch of your cabinet layout. Include every important measurement, like the size of the appliance, the space for ventilation, and the thickness of your materials.
This sketch serves as your map—it helps guide your work and makes sure everything fits together.
- Draw your kitchen wall, marking appliance locations clearly.
- Include every measurement: appliance size, clearance, cabinet thickness.
- Use graph paper or simple drawing apps for neat, scaled sketches.
- Label each part to avoid confusion during building.
4. Use plywood for strength and clean edge finishes
When building your cabinetry, choose plywood as your main material. Plywood is strong, stable, and gives your cabinets a clean, smooth edge that looks great.
It’s better than regular wood for kitchen cabinets because it won’t warp or crack easily. This way, your cabinet doors and shelves stay sturdy and last a long time.
- Choose good-quality plywood for cabinet sides and shelves.
- Avoid particleboard, which can swell with moisture.
- Sand edges smooth before assembly for a clean finish.
- Consider plywood with a smooth veneer for easier painting or staining.
5. Install toe kicks to align cabinet base heights
A toe kick is the small recessed area at the bottom of kitchen cabinets. Installing toe kicks makes sure your cabinet bases line up evenly, even if your floor isn’t perfectly flat.
This keeps your built-in cabinets level and comfortable to use. Plus, it gives you a little space to stand closer to your kitchen counters without stubbing your toes!
- Measure the height of your appliances and counters before building.
- Install toe kicks to keep cabinet bases level on uneven floors.
- Leave about 3-4 inches of recessed space for comfortable standing.
- Use toe kicks to hide gaps under cabinets and protect from damage.
6. Frame around appliances before outer cabinets
Start by building a strong frame around your appliances, like your refrigerator or oven. This frame acts like a sturdy skeleton that holds everything in place. It’s best to build this first before you add the outer cabinets.
Think of it like putting on a foundation before decorating a cake—it keeps everything steady and secure. For example, your refrigerator cabinet needs a solid frame so the fridge fits perfectly without wobbling.
- Build a strong, square frame to hold appliances securely.
- Use 2×4 lumber for a sturdy foundation.
- Check squareness with a carpenter’s square before attaching.
- Make sure the frame is level to prevent appliance tilting.
7. Secure cabinets to studs using 3-inch screws
When you install your cabinets, always attach them to the wall studs. Studs are the wooden beams inside your walls that support heavy weight. Use strong 3-inch screws to fasten your cabinets to these studs.
This keeps your diy built cabinetry safe and steady, especially when you place heavy items on your counter tops or inside the cabinets.
- Locate wall studs with a stud finder before installation.
- Use 3-inch wood screws to attach cabinets firmly to studs.
- Pre-drill holes to avoid splitting wood.
- Check cabinet level and adjust as you secure them.
8. Cut openings precisely with a circular saw guide
To make sure appliances fit neatly, you’ll need to cut openings in your cabinets or side panels. Use a circular saw with a guide to keep your cuts straight and clean. This tool is like a ruler for your saw, helping you avoid mistakes and uneven edges.
Accurate cuts mean your appliances slide right in, and your kitchen gets that custom look instead of a patchwork of parts.
- Use a straight-edge guide or track to keep cuts straight.
- Mark your cut lines clearly before starting.
- Wear safety gear like goggles and ear protection.
- Take slow, steady passes rather than rushing the cut.
9. Use filler strips to close small side gaps neatly
Sometimes, even with careful measuring, tiny gaps appear between cabinets or walls. Don’t worry—this is normal! Use narrow filler strips to close these gaps. They cover up uneven spaces and give your kitchen a polished finish.
You can even use a bit of caulk along the edges to seal it all tight and keep dust out. This step turns “almost perfect” into “spot on.”
- Measure gaps carefully to cut filler strips to size.
- Attach filler strips with wood glue and small nails or screws.
- Sand edges smooth before finishing.
- Paint or stain filler strips to match surrounding cabinetry.
10. Add face frames to hide plywood edges cleanly
Add face frames to your cabinets. These are wooden strips that go around the front edges of your cabinetry. Face frames hide the rough edges of the plywood and give your cabinets a finished, professional look.
They’re similar to a picture frame for your cabinet doors and drawers, making everything look neat and stylish. This step really sets your work apart from plain stock cabinets and adds that beautiful, handcrafted touch you want.
- Cut face frames from solid wood for a neat look.
- Attach frames flush with cabinet fronts using wood glue and nails.
- Sand and finish frames before installing cabinet doors.
- Face frames improve cabinet strength and hide raw plywood edges.
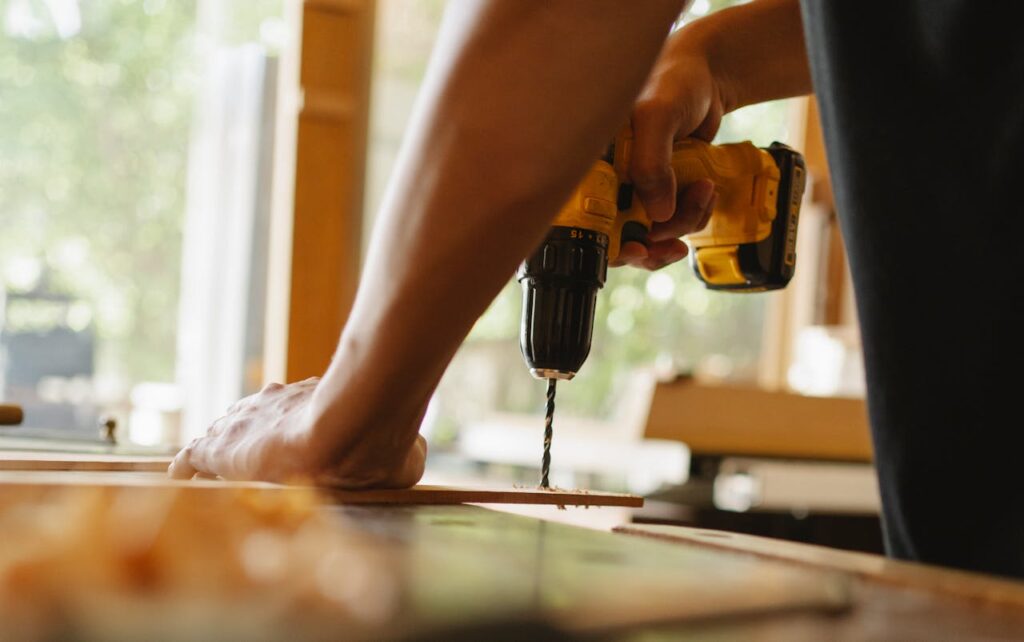
To join your cabinet pieces neatly, use a pocket hole jig to drill holes at an angle. These pocket holes let you screw the pieces together tightly without visible screws on the outside.
It’s a simple woodworking trick that makes your cabinets look clean and strong—kind of like secret handshakes between the wood pieces!
- Use a pocket hole jig to drill angled holes for screws.
- Join cabinet parts with pocket hole screws for a strong hold.
- Hide pocket holes on the inside or back of cabinets.
- Pocket holes create clean joints without visible screws outside.
12. Include cutouts for electrical and water lines
Remember to plan for your appliances’ power and water needs. Cut out spaces in the cabinet backs or sides for electrical cords and water lines.
These cutouts let you plug in your dishwasher, fridge, or other appliances without squeezing or bending wires. This gives your appliances their own little doorways to connect safely.
- Identify where cords and hoses will run behind appliances.
- Use a drill or hole saw to create smooth cutouts in cabinet backs or sides.
- Make cutouts large enough for easy connection and future repairs.
- Keep openings neat to avoid damage and allow good airflow.
13. Install cabinet doors with adjustable hinges
When you put on your cabinet doors, use adjustable hinges. These hinges help you line up doors perfectly, even if your walls or cabinets aren’t totally straight.
With a small screwdriver, you can tweak the fit until the doors open smoothly and close tight. This step makes your kitchen feel high-end and polished, just like cabinets in a fancy store.
- Choose hinges that let you fine-tune door alignment.
- Attach hinges carefully to avoid crooked doors.
- Test door swing and adjust screws for smooth opening and closing.
- Adjustable hinges help create a polished, professional finish.
14. Finish with trim molding to match appliances
Add trim molding around your cabinets to complete the look. Trim hides any gaps and helps your cabinets blend beautifully with your appliances and countertops.
This is means putting on the finishing touches to an outfit—suddenly, everything looks pulled together and stylish.
- Select trim that complements your appliance finishes and style.
- Cut and attach molding carefully around cabinet edges and gaps.
- Use wood glue and finishing nails to secure molding.
- Paint or stain molding to blend perfectly with your cabinets and countertops.
15. Paint or stain all surfaces before final install
Before you set your cabinets in place, paint or stain all the surfaces. Doing this now keeps the finish even and smooth, without missing hard-to-reach spots later.
Choose a color or stain that matches your kitchen’s style, whether bright and modern or warm and wood-toned. This last step seals your hard work and gives your kitchen a fresh, high-end feel.
- Apply primer before painting for better coverage.
- Use even strokes to avoid drips and brush marks.
- Allow plenty of drying time between coats.
- Finish with a clear sealant for durability and easy cleaning.
Conclusion
And there you have it! The steps on how to build custom cabinets around appliances takes time and patience, but it’s worth it.
You end up with a kitchen that looks great and works better. Remember, it’s all about careful planning and making sure every piece has its place.
You don’t have to be a master carpenter to make something wonderful—you just need the right tools, a clear plan, and a little determination.
Take it one step at a time, and before you know it, you’ll be standing in a kitchen that you helped shape with your own hands. Now that’s something to be proud of!
FAQs
1. Is it cheaper to build your own cabinets or buy them?
Building your own cabinets is usually cheaper, especially if you use materials like plywood and do the work yourself. Buying pre-made cabinets costs more but saves time. DIY gives you control over style and size to fit your kitchen perfectly.
2. Can I put my washer and dryer in a cabinet?
Yes, you can put your washer and dryer in a cabinet. Make sure to leave enough space for ventilation, hookups, and easy access. Use waterproof materials and plan for electrical and water connections inside the cabinet.
3. How much does it cost to build custom built in cabinets?
Custom built-in cabinets usually cost between $500 and $1,200 per linear foot. Costs vary based on materials, size, and finishes. DIY building can lower the price by saving on labor, but expect to invest time and effort.
4. What is the downside of cabinet refacing?
Cabinet refacing can be cheaper than replacing, but it doesn’t fix structural issues. It only updates the look. If cabinets are damaged or old, refacing might not last long and may need full replacement later.
5. How do I measure appliances for custom cabinets?
Measure width, height, and depth carefully, including handles and vents. Measure twice to avoid mistakes. Keep a note of extra clearance needed for airflow and door openings.
6. What materials are best for building custom cabinets?
Plywood is best for strength and durability. It holds screws well and resists moisture. Avoid particleboard, which can swell or break easily. Use hardwood for face frames and doors for a polished look.
7. How much clearance should I leave for appliance ventilation?
Leave about 1 to 2 inches around your appliance for proper ventilation. Check the manufacturer’s instructions for specific needs, especially for refrigerators and ovens.
8. Can I build cabinets without professional woodworking skills?
Yes! With basic tools and clear instructions, anyone can build custom cabinets. Start simple, use guides, and take your time. Plenty of online tutorials can help you learn woodworking skills step-by-step.
9. How do I make sure cabinets fit uneven walls or floors?
Use adjustable hinges on doors and install toe kicks to level cabinets. Filler strips help close small gaps. Take precise measurements and check levels frequently during installation.
10. How do I handle electrical and plumbing when building cabinets?
Plan cutouts for wires and water lines early. Use hole saws for smooth openings. Leave extra room for easy connections and future repairs. Always follow safety rules and, if unsure, consult a pro.
11. What tools do I need to build custom cabinets?
Basic tools include a tape measure, circular saw, drill, pocket hole jig, clamps, and screwdriver. A stud finder and level help with installation. You don’t need fancy gear to start your woodworking project.
12. How do I install cabinet doors properly?
Use adjustable hinges to line up doors perfectly. Attach hinges securely and adjust screws to fix gaps or misalignments. Test doors by opening and closing several times before finishing.
13. How do I finish cabinets for a professional look?
Paint or stain all surfaces before final install for smooth coverage. Use primer and sealant for durability. Adding trim molding helps hide gaps and ties the look together with your appliances.
14. Can I build cabinets that match my countertops?
Yes! Choose paints, stains, or veneers that complement your countertops. Use trim molding to create a seamless look that blends cabinetry and countertops nicely.
15. How do I keep custom cabinets looking good over time?
Clean cabinets regularly with mild soap and water. Avoid harsh chemicals. Check hinges and screws every few months and tighten if needed. Touch up paint or stain to fix scratches and wear.